CRM Integration Technical Process - Microsoft Dynamics 365
Last updated: April 24, 2026
Overview
This article covers the technical setup and sync behaviour specific to Microsoft Dynamics 365. For general CRM integration concepts — including field management, data matching, syncing rules, and troubleshooting — see CRM Integration.
CRED's Dynamics 365 integration supports bidirectional sync across 13 entity types (see table below). All data is processed within CRED's secure, SOC II-compliant infrastructure. Data residency depends on your workspace configuration — contact your CRED representative to confirm your hosting region.
CRED supports compliance with major data protection frameworks including GDPR (EU), SOC II, and other applicable regulations.
Integration setup time depends on data volume — for example, ingesting 1M entries may take around 5 hours.
Supported Entities
The following entities are supported by the Dynamics 365 integration. Import (Dynamics → CRED) and Export (CRED → Dynamics) availability varies by entity type.
CRED Entity | Dynamics Object | Import (D365 → CRED) | Export (CRED → D365) |
|---|---|---|---|
Account | account | Yes | Yes |
Contact | contact | Yes | Yes |
Opportunity | opportunity | Yes | Yes |
Opportunity Pipeline | workflow (BPF) | Yes | No |
Opportunity Stage | processstage | Yes | No |
Campaign | campaign | Yes | Yes |
Campaign Member | campaignresponse | Yes | Yes |
Task | task | Yes | Yes |
Note | annotation | Yes | Yes |
Lead | lead | Yes | Yes |
Yes | Yes | ||
Custom Entity Record | (dynamic) | Yes | Yes |
Remote User | systemuser | Yes | No |
Note: Pipelines, Stages, Custom Entity metadata, and Users are read-only (import only). Some entity types (Campaign, Lead, Task, Note, Email) default to read-disabled and must be enabled in sync settings. Custom Entity Records map dynamically to your Dynamics custom object schemas.
How to Connect Microsoft Dynamics 365
Step 1: Access Workspace Integrations
Navigate to My Account → Workspace Integrations or go directly to:
https://commercial.credplatform.com/my-account/workspace-integrations
Find Microsoft Dynamics 365 under the CRM category and click Connect.
Step 2: Enter Your Subdomain and Authenticate
A modal will prompt you to enter your Dynamics 365 subdomain.
For example, if your Dynamics URL is cred.crm.dynamics.com, enter cred.crm in the text field.
The first part (before the dot) is your organisation ID
The second part is your location code (defaults to
crmif not specified)
Click Continue to be redirected to Microsoft's login page. Authenticate with the Azure AD / Microsoft 365 account that has admin access to your Dynamics 365 instance.
Tip: Use a shared service account rather than an individual user account so the connection isn't tied to a single team member.
How to find your subdomain: Log in to Dynamics 365, look at the URL in your browser address bar. The part before
.dynamics.comis your subdomain. For more help, see CRM Integration.
Step 3: Initial Data Sync
After authenticating, you'll be returned to CRED. The initial sync begins automatically.
A progress indicator appears in the sidebar showing read status and percentage complete
Click Start Configuring to open the Integration Wizard, or access it later via Settings on the Dynamics 365 tile
Step 4: Configure with the Integration Wizard
The wizard walks through each imported object:
Field Mapping (Step 1/3) — Map Dynamics fields to CRED fields. Use + Custom to create new CRED fields. Use Ignore to skip a field.
Enrichment Settings (Step 2/3) — Set per-field update mode (see table below).
Create Rule & Credits (Step 3/3) — Set entity-level create rules and review credit estimates.
Sync Behaviour
Sync Schedule
Direction | Frequency | Trigger |
|---|---|---|
Dynamics → CRED (read) | ~Every 10 minutes | Automatic |
CRED → Dynamics (write) | ~Every 10 minutes | Automatic |
Manual push | Instant | "Sync to CRM" button |
Note: Sync timings are subject to change. This page will always reflect current values. For custom schedule configurations, contact your CRED representative.
How Data Flows
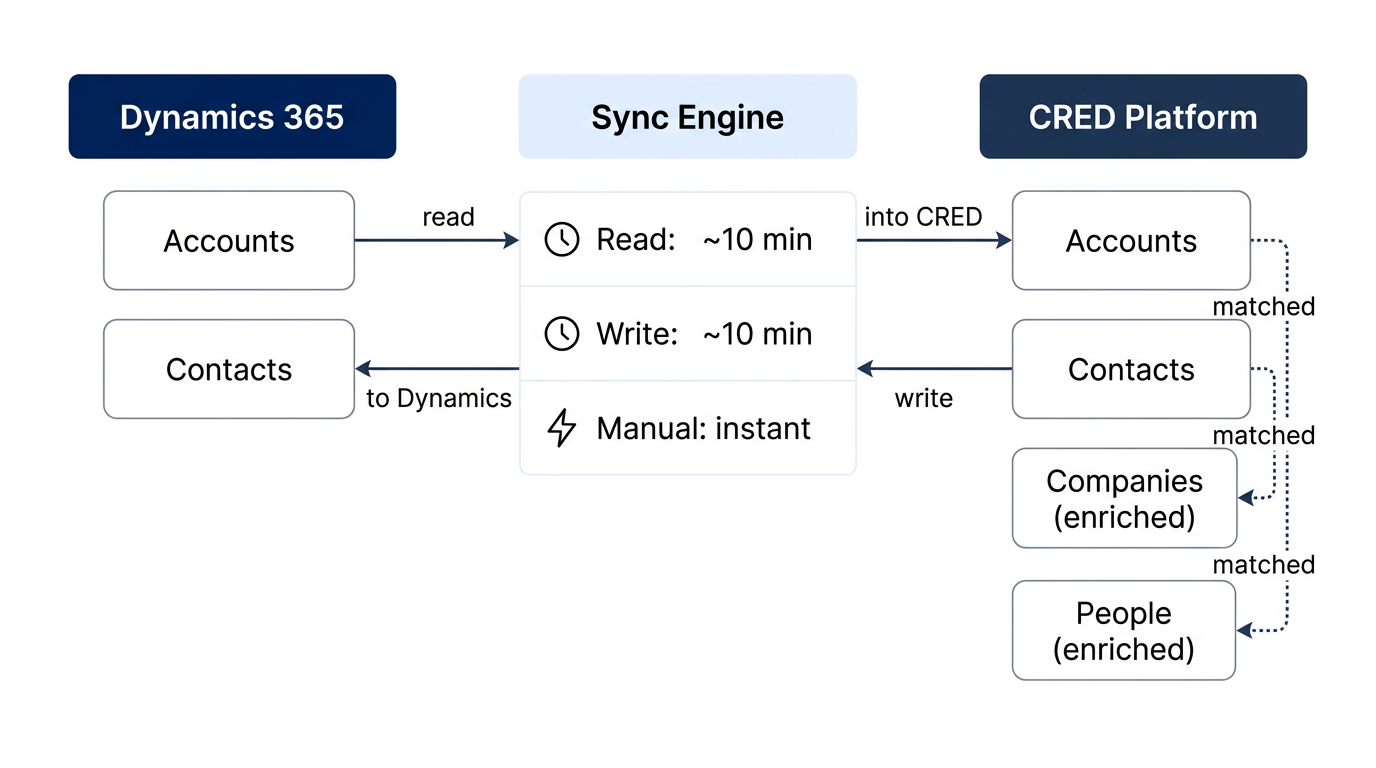
Key Entity Relationships
Each Dynamics Account syncs 1:1 to a CRED Account (stores the Dynamics ID and sync state)
CRED matches the Account to a CRED Company — the enriched entity with financials, sponsorship deals, and audience data
Every synced record carries an Account ID; a Company ID is only present once CRED has matched the account to a known company. Not every account will have a company match.
Each Dynamics Contact syncs 1:1 to a CRED Contact, which CRED then matches to a CRED Person — similar to the Account → Company relationship
Opportunities sync with pipeline and stage data. Dynamics pipelines use Business Process Flows (BPF) which CRED maps to Opportunity Pipelines and Stages.
Where Synced Data Appears in CRED
Synced contacts appear under People → My Contacts
Synced accounts appear under Company → My Accounts
Previous activity history for matched contacts will be visible in the contact timeline
Last activity timestamps are displayed within both CRED and Dynamics
Manual Sync
Trigger syncs manually via:
Per record: 3-dot menu on a company/contact row or sidebar
In bulk: Select records → "Export" action bar button, or sync an entire list via the "Export" button (top right). List-level sync is currently available for Accounts and Contacts only.
Field Settings
For full field management documentation, see CRM Integration — Field Management.
Default settings: New Dynamics connections default to Null Value Only update mode and Manual create rule. Adjust these in the Integration Wizard after your initial sync completes.
Per-Field Update Modes
Mode | Behaviour |
|---|---|
Overwrite | Always replace the Dynamics value with the CRED value |
Null Value Only | Only populate if the Dynamics field is currently null/empty |
Off | Do not update this field |
Per-Entity Create Rules
Rule | Behaviour |
|---|---|
On | Allow creating automatically new record in CRM |
Manual | Only create when user explicitly clicks on "Sync to CRM" |
Off | Never create new records |
Required Fields
There are two levels of field requirements:
Required in CRM — the field is mandatory in Dynamics. If it's empty, Dynamics will reject the record on write.
Required in CRED — the field is marked as required within CRED's sync settings. The record will not sync until that field is populated, and the sync button will be disabled with a message indicating which fields are missing.
Is Exportable?
An admin-level toggle per field that controls whether the field data can be included in CSV exports. Use this to comply with internal data handling policies — fields marked as non-exportable will not appear in any exported file.
Read & Write Controls
Each mapped field has configurable read, update, and delete settings. To remove a field from syncing, unmap it in the Integration Wizard.
Sync Limits
Sync limits vary based on your selected CRED plan. Contact your CRED representative to understand the limits applicable to your workspace.
Matching & Deduplication
CRED automatically matches Dynamics accounts to CRED companies based on domain and other identifiers
Matching statistics (matched vs total) are visible in the Integration Wizard and under My Account → Settings → Matching
Click on a row to adjust which CRED Company an imported account is matched to
Monitor remaining (unmatched) accounts and manually find matching entries
CRED flags potential duplicates for review rather than auto-merging
Go-Live Checklist
Before rolling the integration out to your team:
☐ Verify the authorising Azure AD / Microsoft 365 user has the correct Dynamics 365 permissions
☐ Confirm the correct subdomain and location code were entered during setup
☐ Ensure all essential fields are mapped and update modes are set correctly
☐ Confirm required fields are populated for records you intend to sync
☐ Enable read sync for any additional entity types you need (Campaign, Lead, Task, Note, Email are off by default)
☐ Test sync functionality with a sample set of records in both directions
☐ Validate that reporting data is accurate post-sync
☐ Train sales and support teams on the new integration workflow (manual sync, matching, troubleshooting)
☐ Review "Is Exportable?" settings for sensitive fields
Disconnecting Dynamics 365
To disable or disconnect the integration:
Go to My Account → Workspace Integrations
Find the Microsoft Dynamics 365 tile and click Settings
Click Disconnect to revoke the connection
Disconnecting stops all syncing. Existing records in both systems are retained but will no longer update. Re-connecting will require a new OAuth flow and a fresh initial sync.
Troubleshooting
Sync errors
Check the sync issues sidebar on the account record for field-level error codes and messages. Common issues:
Record not syncing — Check if required fields are populated. Verify the Dynamics connection is active under Workspace Integrations. Confirm read sync is enabled for the entity type.
Duplicate records — Use the Matching tab to reconcile. Set create rules to Manual or Off to prevent automatic creation.
Permission errors — Confirm the authorising Microsoft user has the necessary Dynamics 365 access. Re-authenticate if permissions were changed.
Rate limiting (429 errors) — Dynamics enforces API rate limits. CRED automatically retries with backoff, but high-volume syncs may be temporarily throttled.
Filing a support ticket
When reporting a sync issue, include:
Screenshot of the affected record (both CRED and Dynamics)
Which fields are mapped and their update modes
Expected vs actual behaviour
Steps to reproduce
Error details from the sync issues sidebar
Related Articles
CRM Integration — General setup, field management, data matching, syncing rules
Integrations and Import — Full integrations collection
Important Notes
This is a living reference and will be updated as the integration evolves
The integration supports syncing of multiple entity types — contact your CRED representative for the latest list
Sync timings are approximate and may change
All data is stored in a segregated, encrypted instance and only accessible to permitted organisations. Data residency varies by workspace — confirm your region with your CRED representative
For custom configurations, schedule adjustments, or feature enablement, contact your CRED representative